The idea of replacing all the plumbing in your home sounds like a massive, disruptive project. And it’s understandable why many homeowners put it off — the mental image of torn-up walls, no running water, and a house that’s unlivable for a week is enough to make anyone delay the decision.
The reality is quite different from that worst-case picture. Modern repiping techniques have made the process faster, cleaner, and far less disruptive than most people expect. Understanding what actually happens — and how long each phase takes — makes the whole thing a lot less intimidating.
Before the work begins
A repipe starts with an evaluation. A licensed plumber inspects your current plumbing system, identifies the pipe material, checks the condition of visible pipes, tests water pressure at multiple fixtures, and maps out the layout of your home’s plumbing.
This evaluation serves two purposes. It confirms that a full repipe is the right call (rather than targeted repairs), and it allows the plumber to plan the most efficient route for the new pipes. In Florida, where many homes are built on concrete slab foundations, the routing plan is particularly important because it determines whether new pipes can run through the attic and down through walls — avoiding the need to cut through concrete.
After the evaluation, you’ll receive a detailed quote that covers the scope of work, the material being used, the timeline, whether drywall patching is included, and the permit and inspection process. In Florida, a plumbing permit is required for a whole-house repipe, and your plumber should handle the permit application and schedule the required inspections.
Day one: the main event
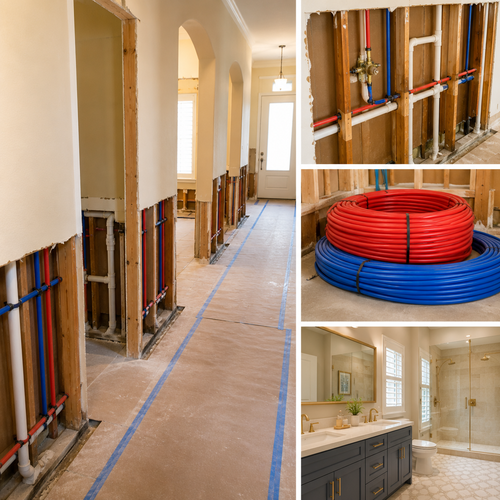
On the first day, the crew shuts off the water supply and begins installing the new pipe system. For most homes using PEX, the plumber runs a main supply manifold — essentially a central hub where the new main line splits into individual lines for each fixture in the house. From the manifold, individual lines run through the attic, down through walls, and connect to each sink, toilet, shower, water heater, washing machine, and outdoor faucet.
To do this, the crew needs to create access points. That means cutting small openings in walls and sometimes ceilings to route the new pipe. A good crew minimizes these cuts by planning their routes carefully and using the flexibility of PEX to navigate around obstacles.
The old pipes are typically left in place unless they’re in the way of the new installation. Removing every inch of old pipe would require significantly more wall demolition for no practical benefit. The old pipes are simply disconnected and abandoned in place — they stop carrying water, and the new system takes over.
By the end of the first day on a standard-sized home, the new pipe system is usually roughed in and pressure-tested. Pressure testing involves filling the new system with water at higher-than-normal pressure and checking for any leaks at connections. If everything holds, the system passes.
Water during the process
One of the biggest concerns homeowners have is how long they’ll be without water. In most cases, the water is shut off during the working day — roughly eight in the morning to five in the afternoon — and restored each evening. That means you’ll have running water every night for showers, cooking, and normal use.
Some plumbers can stage the work so that certain fixtures are available even during the day, though this depends on the layout of the home and the scope of the project. It’s worth asking about this during the quoting process if daytime water access is important to you.
You do not need to leave your home during a repipe. The work is localized to the plumbing system, and while there will be some noise and activity, most homeowners stay in the house throughout the project without significant issues.
Day two and beyond: connections and cleanup
The second day typically involves completing fixture connections, testing every fixture for proper flow and temperature, and beginning wall repairs. For smaller homes with fewer bathrooms, the plumbing work may be complete by midday on the second day.
Larger homes — those with three or more bathrooms, complex layouts, or multi-story construction — may require a third or even fourth day for the plumbing portion. The general rule is two to three days for an average single-story Florida home, and three to five days for larger or more complex properties.
Wall repairs and finishing
Once the plumbing work is done and inspected, the access points in the walls need to be patched. Some plumbing companies include basic drywall patching in their repipe quote — they’ll close up the holes, apply joint compound, and sand them smooth so the patches are ready for paint.
Other companies handle only the plumbing and leave the wall repair to you or a separate contractor. This is an important detail to clarify when comparing quotes, because drywall repair can add several hundred dollars to the project if it’s not included.
Repainting the patched areas is generally the homeowner’s responsibility. The patches will be smooth and ready for paint, but they won’t match the existing wall color until you paint over them.
The inspection
Florida requires a plumbing inspection for whole-house repipes. Your plumber should schedule this with the local building department after the installation is complete. The inspector verifies that the new system meets the Florida Building Code, including proper pipe sizing, support, connections, and compliance with local requirements.
Once the inspection passes, you’ll have documentation that your home has been repiped to code — which is exactly what your insurance company, your home inspector, and any future buyer will want to see.
What it costs in the Florida Panhandle
For homes in the Pensacola-to-Panama City corridor, a full repipe with PEX typically runs between $4,500 and $12,000, depending on the size of the home, the number of fixtures, and the complexity of the layout. Copper repipes run higher — roughly $7,000 to $15,000 or more for the same scope.
The main factors that affect cost are the number of bathrooms and fixtures (more fixtures means more pipe and more connections), the accessibility of the plumbing (slab foundations can add complexity), and whether drywall repair is included in the quote.
Getting at least two or three quotes from licensed plumbers in your area is worthwhile. Compare not just the price but the scope — does it include the water heater connections, outdoor faucets, drywall patching, and permit fees? The lowest quote isn’t always the best value if it excludes work that the higher quotes include.
After the repipe
Once the new system is in, pressure-tested, inspected, and the walls are patched, you’re done. The new plumbing system will deliver consistent water pressure, clean water, and reliable performance for decades.
If the repipe was driven by an insurance issue, contact your carrier with the inspection documentation. In most cases, the plumbing issue will be resolved and your coverage options will improve immediately.
If the repipe was done in preparation for a home sale, keep all documentation — the permit, the inspection report, the plumber’s warranty, and the receipt — to provide to buyers and their inspectors. This paperwork removes the plumbing question from the negotiation entirely.
At Mechanical Plumbing Systems, we handle repipes for homes across Alabama and the Florida Panhandle. If you’re considering a repipe and want to understand what it would look like for your specific home, talk to our team — we’ll give you a clear picture of the process, timeline, and cost before you commit to anything.